For Windows: Noise and audio dropouts occur during playback.
Below, we show you standard measures to be taken when noise occurs.
Please try them in order and see if they remedy the situation.
Measure 1: Install the appropriate Yamaha Steinberg USB Driver
Install the Yamaha Steinberg USB Driver included in the zip file downloaded from Steinberg Download Assistance.
If the driver has already been installed, try uninstalling and then installing it again. Yamaha Steinberg USB Driver V2.1.0 or later are required.
You can check the current driver version in the About section of the Yamaha Steinberg USB Driver Control Panel.
How to open the Yamaha Steinberg USB Driver Control Panel
*For driver version V1: Start Menu > Windows System Tools > Control Panel, click Yamaha Steinberg USB Driver.
*For driver version V2 or later: Start Menu > Yamaha Steinberg USB Driver > Control Panel.
Measure 2: Run Windows Update
Please check to see whether running Windows Update changes the situation.
Note that you may need to run Windows Update more than once.
Please try multiple times and update all items.
Measure 3: Check the physical connection between the computer and RUio16-D
If the RUio16-D is not properly recognized as a USB connection by your computer, it may cause noise or audio dropouts.
If you are using a USB hub, connect directly to your computer’s USB port instead.
Also, in order to isolate the problem: Even if you are connecting directly to a USB port on your computer, connecting to a different USB port may produce different results, so please try that.
Also, if you are using a USB cable other than the included USB cable (such as USB-C to USB-C or USB-C to USB-A), please try replacing that.
*In some cases, noise may occur because a USB 3.0 port is used. Although this may be difficult in many instances especially with laptop computers, in some cases it can be solved by installing a USB 2.0 connection port and connecting the RUio16-D to this. Normally, we do not recommend using a USB hub, but if you have a USB 2.0 hub, connecting through it and checking operation is also an effective way to verify.
Measure 4: Check the computer’s power saving settings
RUio16-D operation may become unstable due to the power saving functionality of the computer’s OS.
Open Control Panel > Power Options, turn off all active power saving settings (sleep, etc.), and then check the operation.
In addition to the above, it may be necessary to set the power saving function in the computer’s BIOS/UEFI.
Please search for information online or contact the manufacturer to find out about computer settings including BIOS/UEFI. We apologize for any inconvenience this may cause.
Measure 5: Disable USB Selective Suspend for Windows 10 (Windows 10, version 1903 or later)
Please try turning off the suspend function for the USB port to see if the symptom you have indicated can be remedied.
- Right-click Start Menu > Left-click Power Options.
- In the “Power & sleep” settings, left-click “Additional power settings”.
- After checking the currently selected power plan, left-click “Change plan settings” on the right.
- In the Edit Plan Settings window, left-click “Change advanced power settings”.
- In the Power Options window, left-click the [+] button to the left of “USB settings”.
- Left-click the [+] button to the left of “USB selective suspend settings”.
- Set to “Disabled”.
- Left-click Apply.
- To make sure, restart your computer.
Measure 6: Change the computer’s operation settings
Changing the computer’s operation settings may stabilize operation and reduce noise.
Please try the steps below.
How to enable setting to prioritize “Background services” under “Processor scheduling”
- Open Control Panel and double-click System. *For information on how to open Control Panel, refer to the item below on changing the buffer size.
- Click “Advanced system settings” on the left side of the window that appears.
- The System Properties window will open. Click the Advanced tab.
- Under Performance, click Settings to open the Performance Options window, and click the Advanced tab.
- In the “Processor scheduling” section, set “Adjust for best performance of:” to “Background services”.
- Click the OK button to close the window.
Measure 7: Change the graphics card settings and update the graphics driver
Improvements may be achieved by updating the graphics card driver on the computer you are using to the latest version or by changing the graphics card settings.
The following items can be considered as an overview of setting changes.
- Turn off optional functions for gaming in the graphics card settings.
- Turn off optional functions for power saving in the graphics card settings.
- If you are using multiple GPUs, try using a single GPU.
- If you are using built-in graphics and an external graphics card, try using only the built-in graphics.
How to change the settings differs depending on the graphics card manufacturer and model number and the computer manufacturer, so please consult the graphics card manufacturer or the computer manufacturer for information on detailed settings.
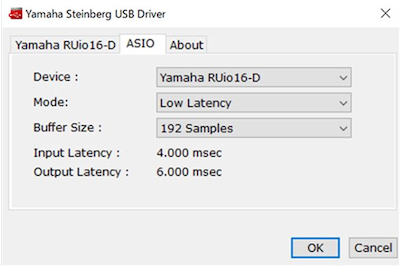
Measure 8: Change the Buffer Size
Follow the procedure below to change the buffer size of the Yamaha Steinberg USB Driver to a value (Samples) larger than the current value (Samples).
1. To open the Yamaha Steinberg USB Driver Control Panel
- Windows Start Menu > Yamaha Steinberg USB Driver > Control Panel
2. Click the ASIO tab on the window below and change Buffer Size to a value larger than the current value.
Measure 9: Check the sampling rate
If the sampling rates of the RUio16-D and VST Rack Pro do not match, it may cause noise or audio dropouts.
Follow the steps below to check the sampling rate of VST Rack Pro.
1. Open the Control Panel by following the steps below. Start Menu > Yamaha Steinberg USB Driver > Control Panel
2. Open the RUio16-D tab.
3. Check the current sampling rate. As an example, if the playback software or the music data being played is 48 kHz, set this parameter to 48 kHz. *Set the setting value to the same value as the specifications and settings of the audio software you are using.
If you are using multiple audio playback programs at the same time, the sampling rate settings may differ between the software applications, causing noise.
Try it with only one program launched.
Measure 10: Check for devices other than the RUio16-D
There may be other causes of noise besides the RUio16-D, such as speakers or headphones connected to RUio16-D, cables connecting each device, and so forth.
Check that the problem you have indicated is not caused by a device connected to the RUio16-D, by replacing a device other than the RUio16-D with another device or connecting it to another device.
If you are connecting the RUio16-D to your computer via a USB hub, connect it directly to your computer without using a USB hub.
Measure 11: Checking the load on the computer
After restarting the computer, close as much of the software running in the background as possible, and try operation when the computer is under a light load.
If a problem occurs when you launch multiple programs at the same time, please check the settings of this software.
Please try reducing the load on your computer by making sure that there is no software running in the background, that OS updates and security scans are not running, and that multiple programs are not running at the same time.
Measure 12: Try moving away from Wi-Fi routers and mobile phones
If there is a device that emits radio waves such as a Wi-Fi router or mobile phone near RUio16-D or computer, electromagnetic noise may be picked up and audio noise may be generated from RUio16-D.
If this occurs, try increasing the distance between these devices and RUio16-D to see if there is any change in the situation.
Measure 13: Temporarily disconnect from the internet
In rare cases, noise may be picked up from internet connections such as Wi-Fi and Ethernet.
Please check RUio16-D operation after temporarily disabling internet connections such as Wi-Fi and Ethernet.
If the noise subsides when the internet connection is temporarily disabled, upgrade your Wi-Fi router or other internet device.
Measure 14: Close unnecessary applications
Turn off all antivirus software, screen savers, and resident programs running in the background.
Also, please close all unnecessary applications and check again.
*To be safe, please turn off antivirus software after disconnecting from the internet.
Measure 15: Processor background service priority setting
Enable the setting to prioritize “Background services” under “Processor scheduling”.
[Procedure]
- From the Windows Start menu, open Control Panel and then double-click System.
- The System Properties window will open. Click the Advanced tab.
- Under Performance, click Settings to open the Performance Options window, and click the Advanced tab.
- In the “Processor scheduling” section, set “Adjust for best performance of:” to “Background services”.
- Click the OK button to close the window.
*Settings for advanced computer users
Audio may drop out due to compatibility issues with the computer’s hardware specifications.
In such cases, please check the following items. Please note that these settings operate the BIOS/UEFI settings, etc. The computer may fail to boot up depending on the settings used. We will bear no responsibility if your computer does not start after configuring the following settings. Please be aware of this and proceed with care.
There are many technical terms for advanced users.
If you do not understand the technical terms or descriptions, we recommend that you refrain from changing these settings.
Try updating the UEFI/BIOS of your computer and changing the settings.
- If your computer has an older version of UEFI/BIOS, try updating to the latest version.
- If you are using an Intel CPU, try disabling Turbo Boost or disabling EIST in the BIOS/UEFI settings.
- For AMD CPUs, try turning off the functions corresponding to the above (Precision Boost 2, Eco Mode, etc.) in the BIOS/UEFI settings.
*Please search for information online or contact the manufacturer to find out about computer settings including BIOS/UEFI. We apologize for any inconvenience this may cause.
Even if you try all of the above, the audio dropout or noise may not be resolved.
In such cases, the only other suggestion we can offer is to try the RUio16-D on another computer. Thank you for your understanding.